The most Pinterest-y thing I’ve ever made (and I don’t make Pinterest things!)
Who’s making the cutest goddamn snack food for my kids that you’ve ever seen? Couldn’t be me. But it is!!

Just the cutest fucking veggie bugs that you’ve ever seen!
Stacey of years gone by would never ever have called herself a Pinterest mom. You would never have found me in the kitchen cutting my kids sandwiches into stars or creating elaborate landscapes using various fruits and vegetables. I wasn’t about that life, you know? It seemed like a shit ton of extra time that I simply didn’t have.
But hey, as they say, with age comes wisdom, and sometimes you realize that perhaps you’re an idiot and you've been looking at things all wrong.
Maybe the goal of these kitchen art projects was never to spend hours creating masterpieces that you know your kids are going to turn their noses up at (how dare they by the way, I got an 82% in grade 10 art class thankyouverymuch) Perhaps the real goal should have been to give them the opportunity not only to get creative in the kitchen, but to get creative in the kitchen while unknowingly completing an activity that fills some of the long-ass dead time in the middle of the day!
I gave the idea of making food creatures with my youngest a few Saturdays ago and it turns out, it was actually pretty fantastic. Who knew? Yes I know, probably everyone on Pinterest from 2010 but whatever. I was beyond pumped with the results. Probably more than my 5 year old but what does he know anyway. What he knew that he got to play with his food and eat bugs or at least veggies that looked like bugs which was good enough for him.
March break is fast approaching my friends, and with it comes the hours and hours of hearing "I’m boooooored" or the ceaseless “I’m hungrryyyyyy’s” that inevitably follow. I hate it oh so much. But fear not, besties because I’m here for you with this sweet little activity that will fill at least one of the 3270 hours of March break. Not only that, but it’s going to fill your babies bellies AND teach them a few kitchen skills. Holy fucking shit it’s a trifecta of incredible.
Now listen, if you know my family, you know my wife is the artist. Like, has a literal degree in fine arts so I need you to lower your expectations about how these are going to look. Which ones were made by me? Which ones by the 5 year old? Hard to tell, I know. The goal here is not to get bogged down in how perfect your creations are going to turn out because I’m telling you now, they’re not going to be perfect. Far from it. But you’re doing something fun with your kids and that is the point. That’s the point, right?
You can use whatever fruits and veggies your kids will eat and are into. I’m going to give you a list of the ones that work in our house but feel free to get fucking crazy. The world is your oyster…or your cauliflower, or whatever.
Cheeky Circle Creations
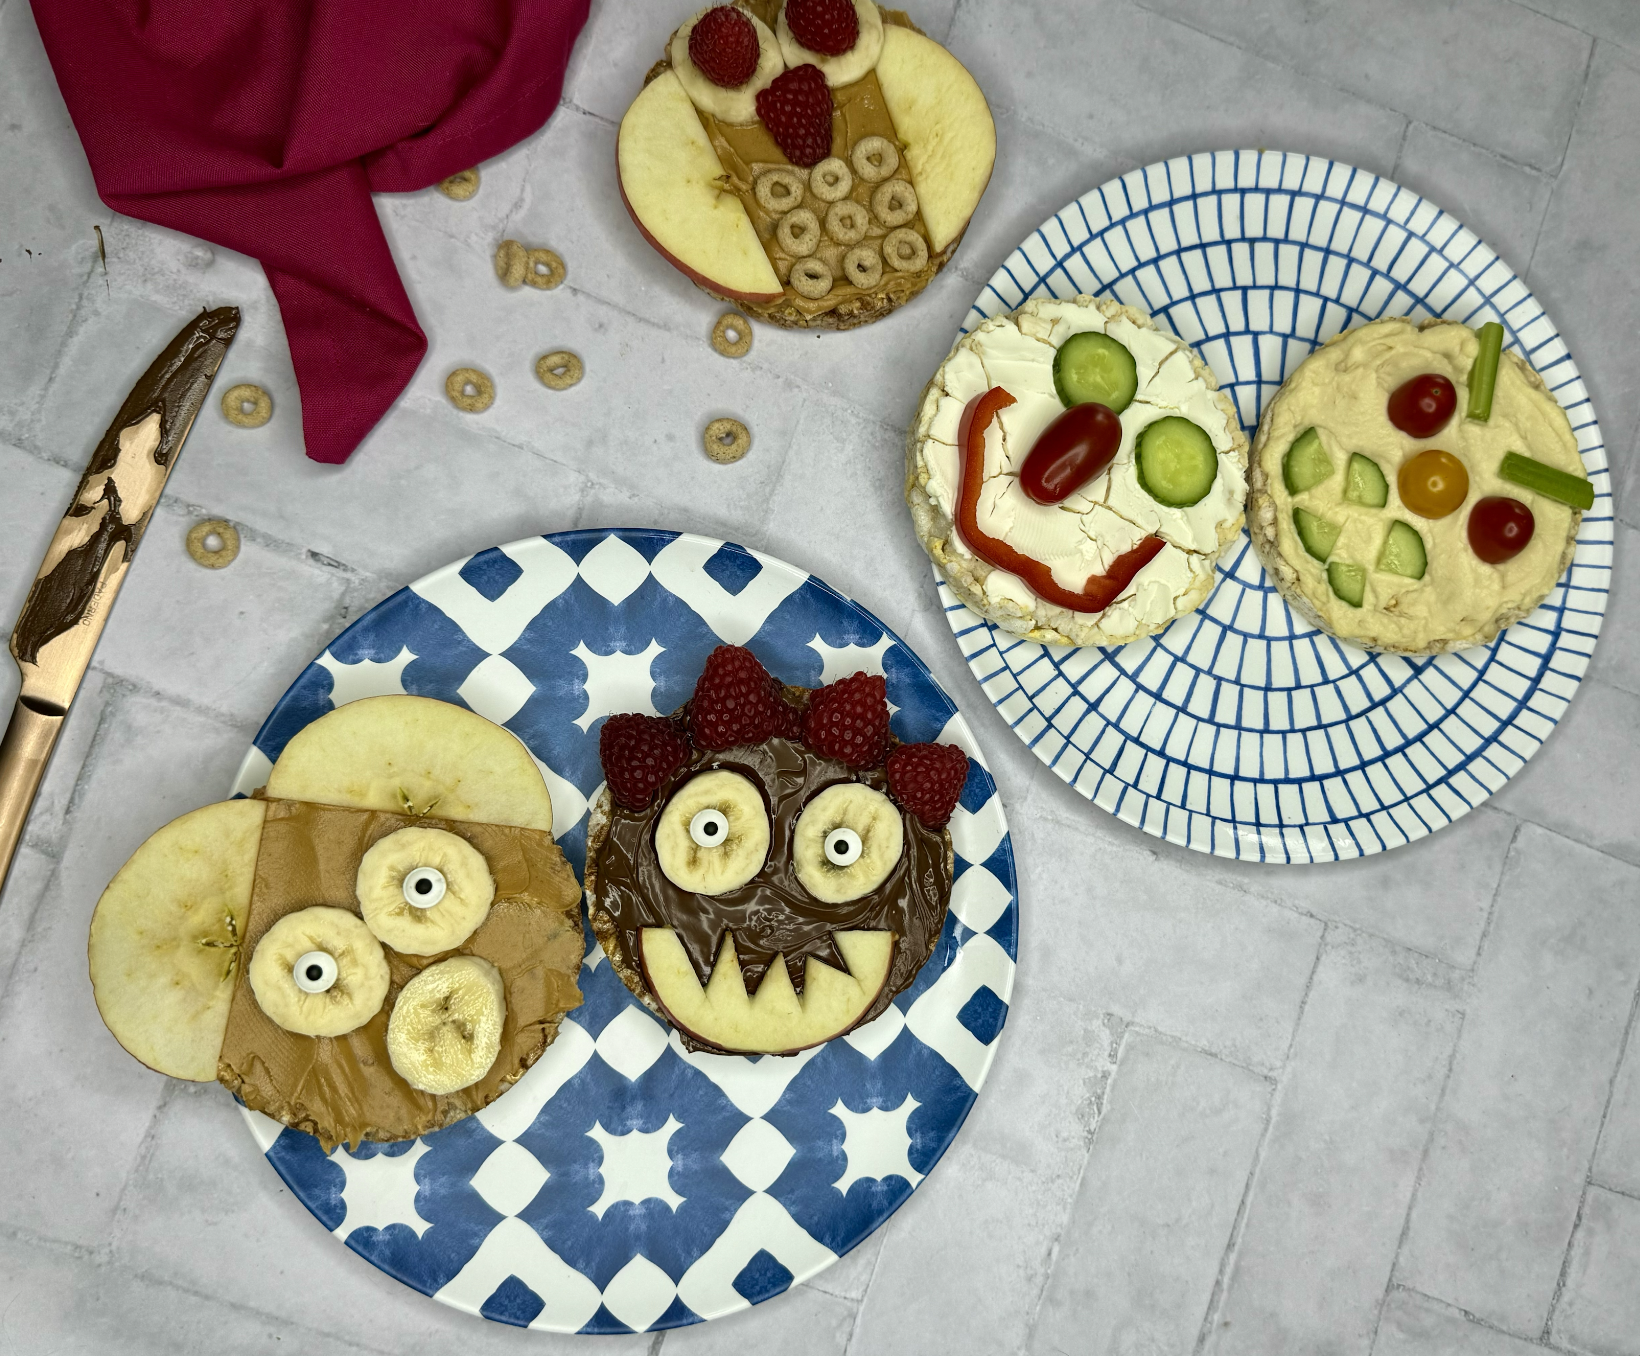
WHAT GOES IN IT
Rice cakes- we like the cheddar flavoured ones for savoury snacks and the caramel for sweet but use whatever your kids will complain least about!
EGGO waffles- these are the clear favourite in our house
Nut butter- peanut butter, wow butter, Nutella
Cream cheese- try flavoured if you’re feeling fancy
Assorted fruits (bananas, strawberries, blueberries, kiwi, mango, etc.)
Optional toppings: mini chocolate chips, shredded coconut, raisins, dried fruit or cheerios or other breakfast cereal- get as creative and go shopping in your pantry!
HOW TO MAKE IT
Prepare Your Base:
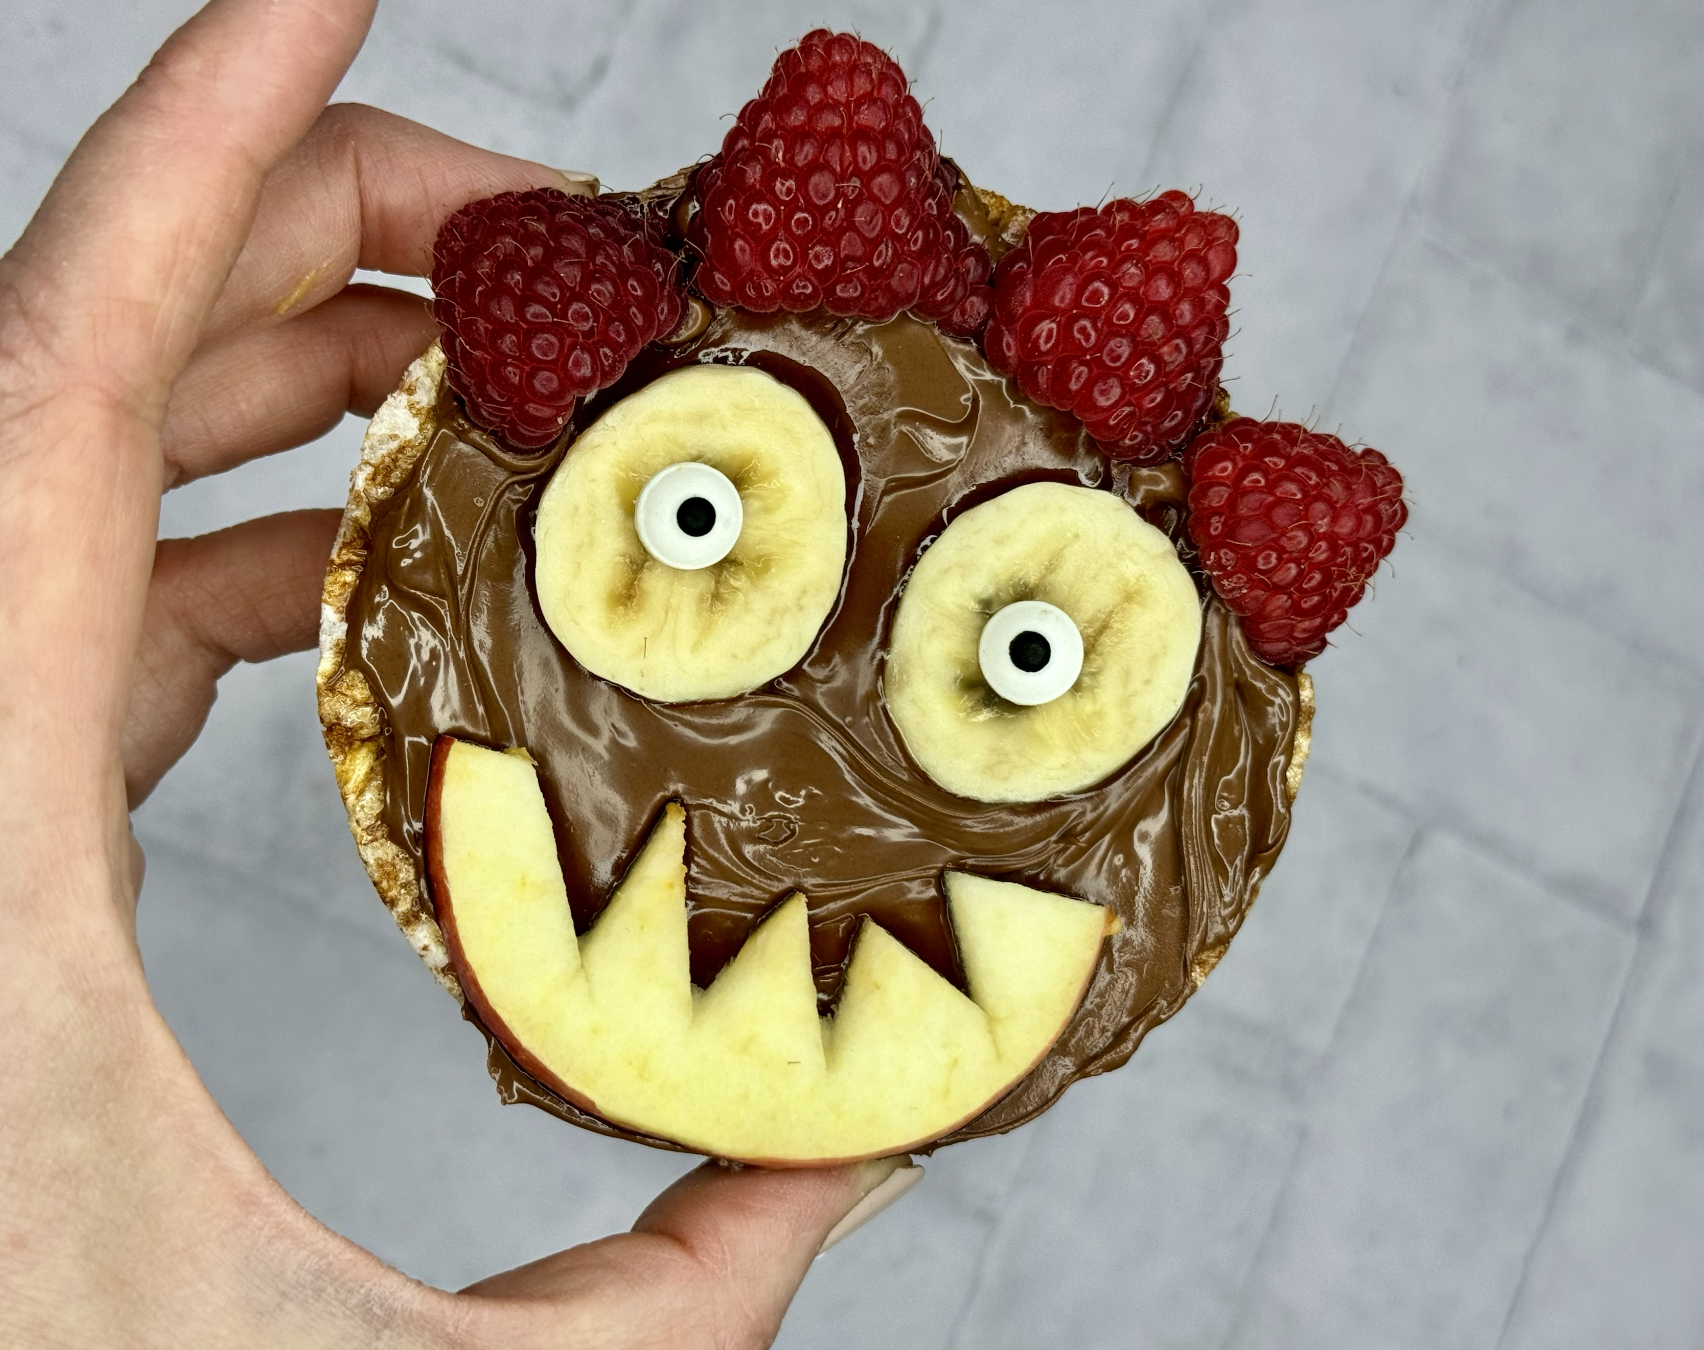
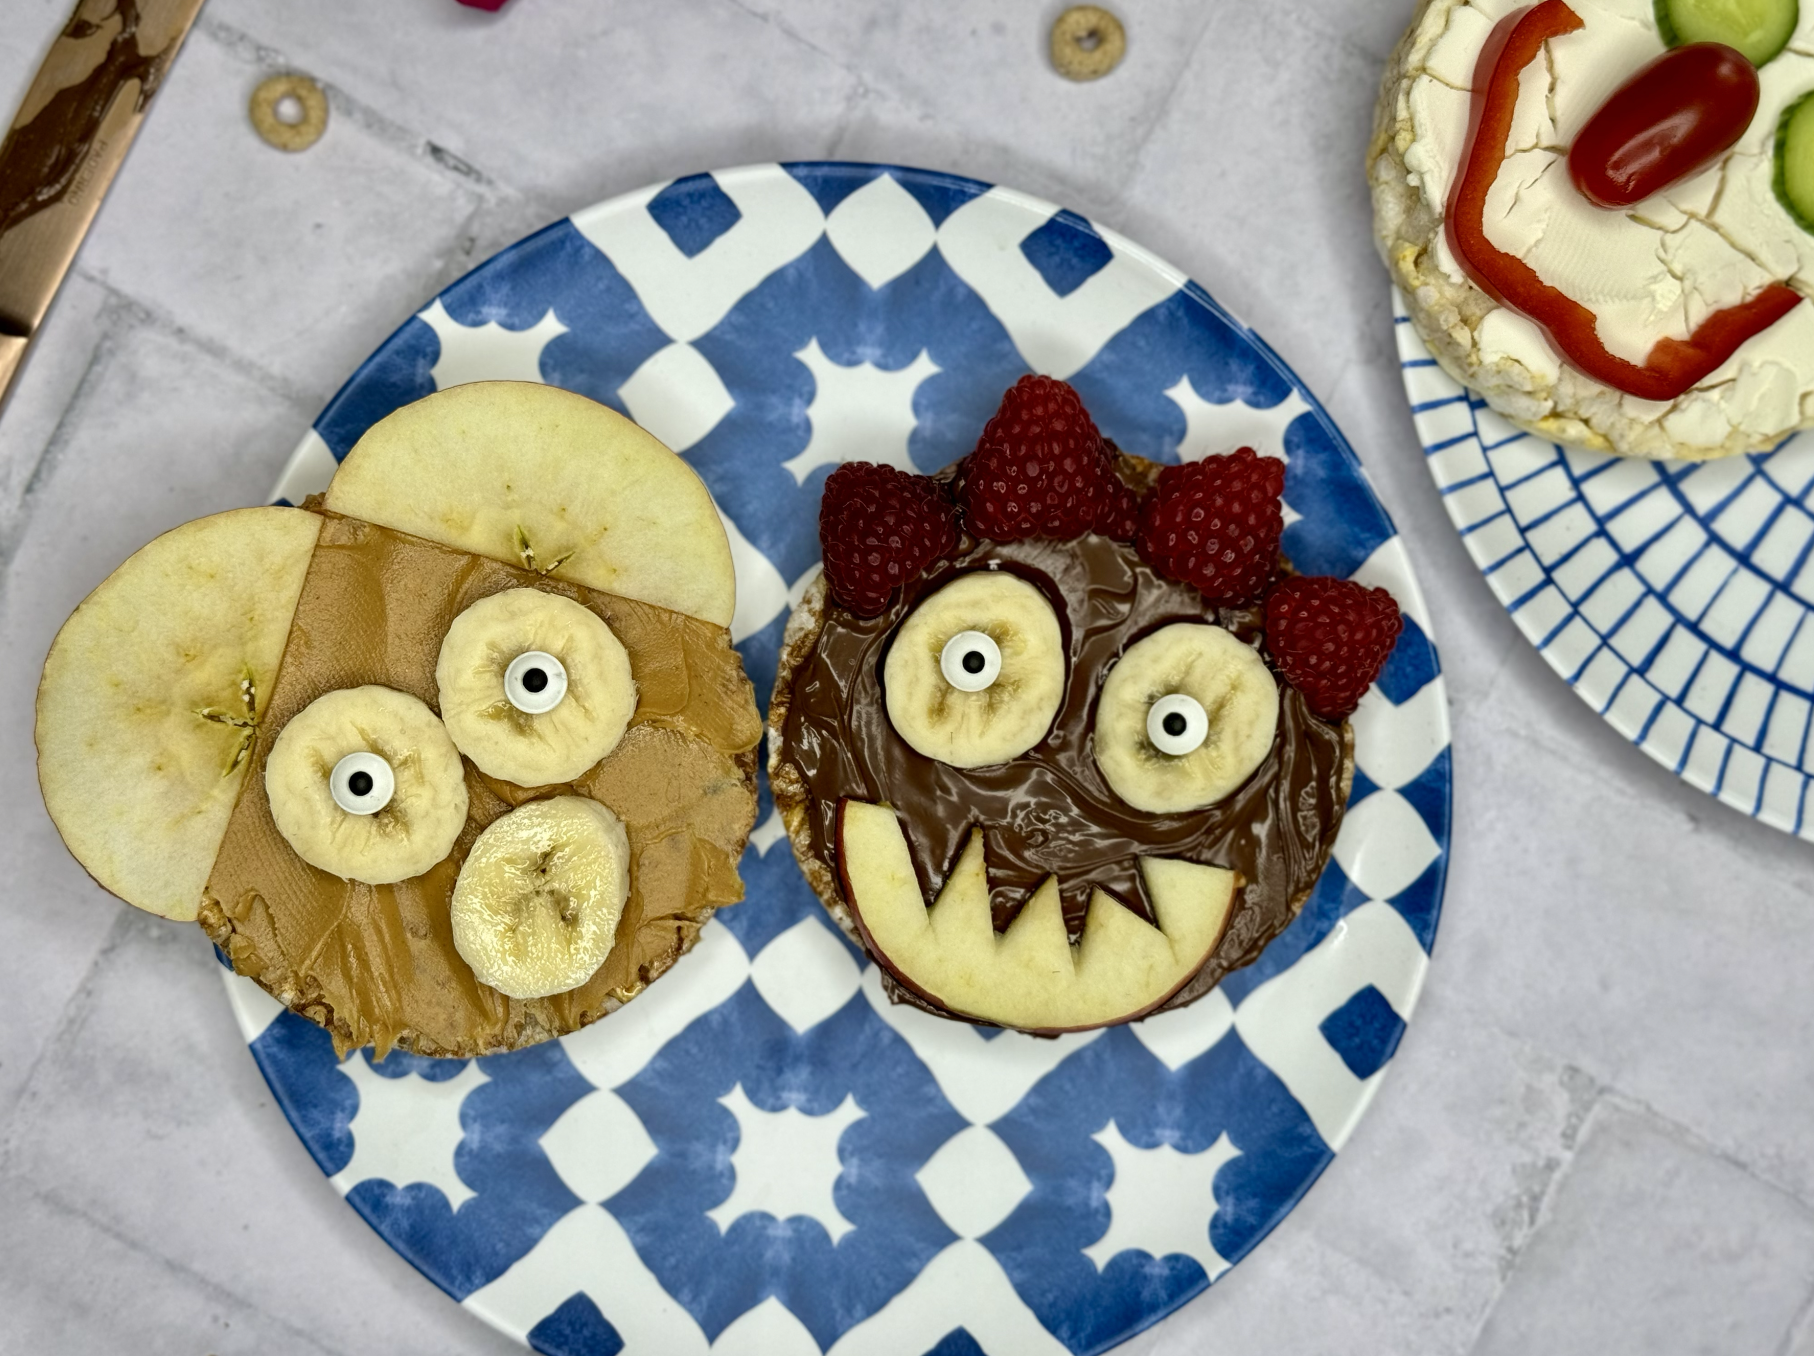
Start by spreading a thin layer of nut butter evenly over the surface of a rice cake or waffle. This will act as the "glue" to hold your fruit decorations in place.
Create Your Creatures:
There are no rules here. You can create any animal you want but in our house, we’re big fans of scary faces. My youngest is all about creepy things. Let your kids use their imaginations and be wowed or, in the case of my son, concerned about what they come up with!
Bear Example: Slice a banana into thin rounds for the ears and nose. Place two banana slices near the top of the rice cake for the ears and one larger slice towards the bottom for the nose. Add two small dots of nut butter or mini chocolate chips for the eyes and a thin slice of strawberry for the mouth. Boom. You’re an artist.
Add Finishing Touches:
Once you've arranged your fruit to create your animal faces, you can add extra details using optional toppings like shredded coconut for fur, raisins or dried cranberries for noses or mouths, or sliced almonds for ears or wings. It really depends on how inspired you’re feeling and how much patience you have that day!
PRESS THE EASY BUTTON: Use EGGOs. They’re a much easier sell. Or, make sure to use the flavoured rice cakes because no one wants to eat Styrofoam. Even Styrofoam that is decorated like an owl.
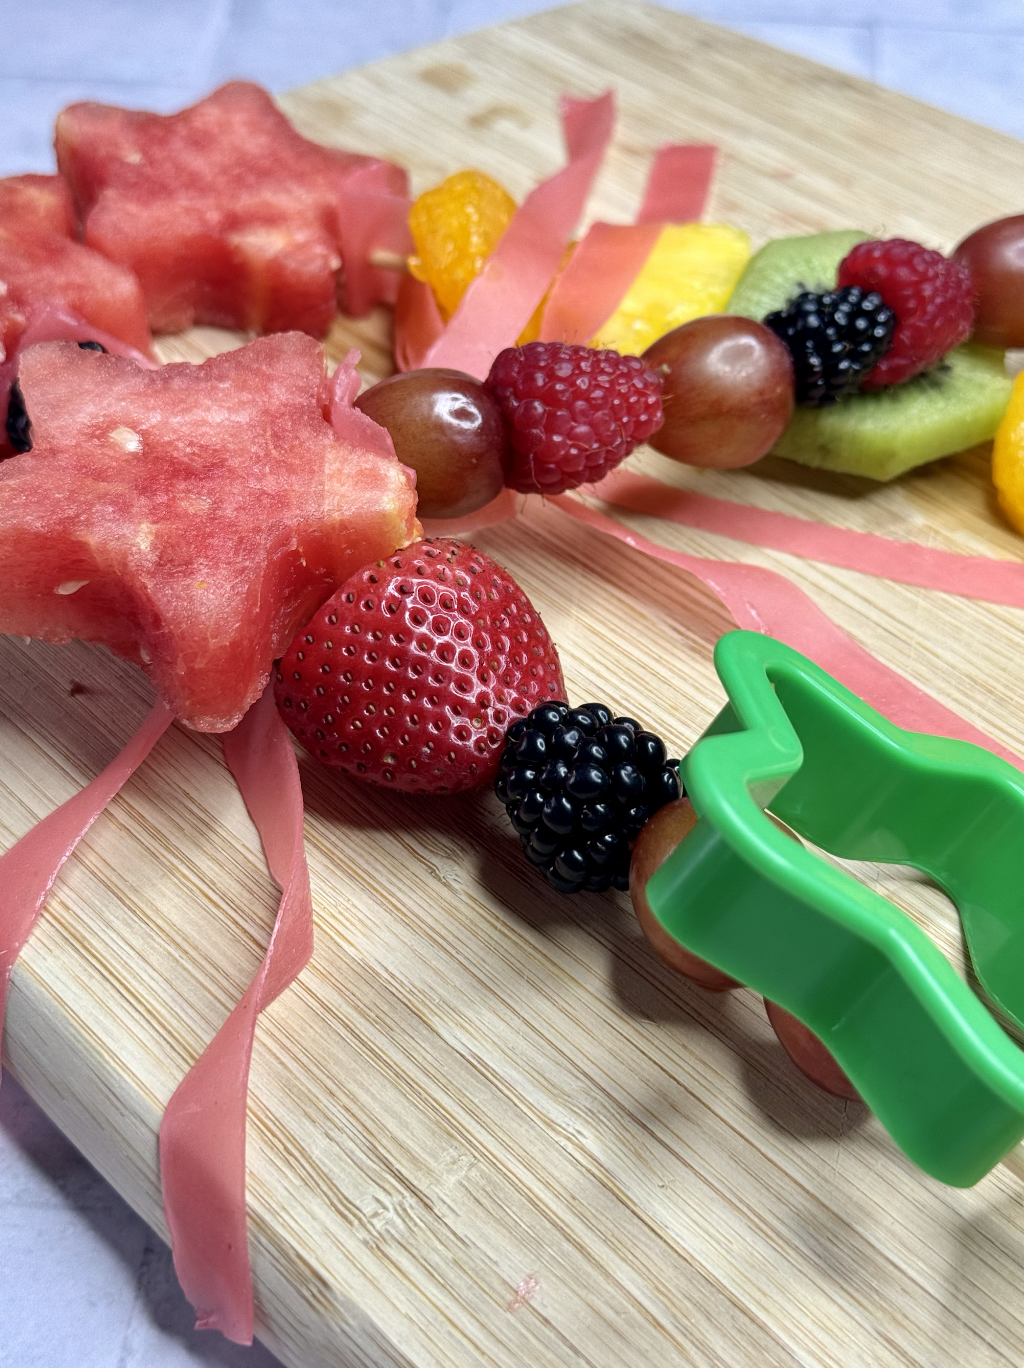
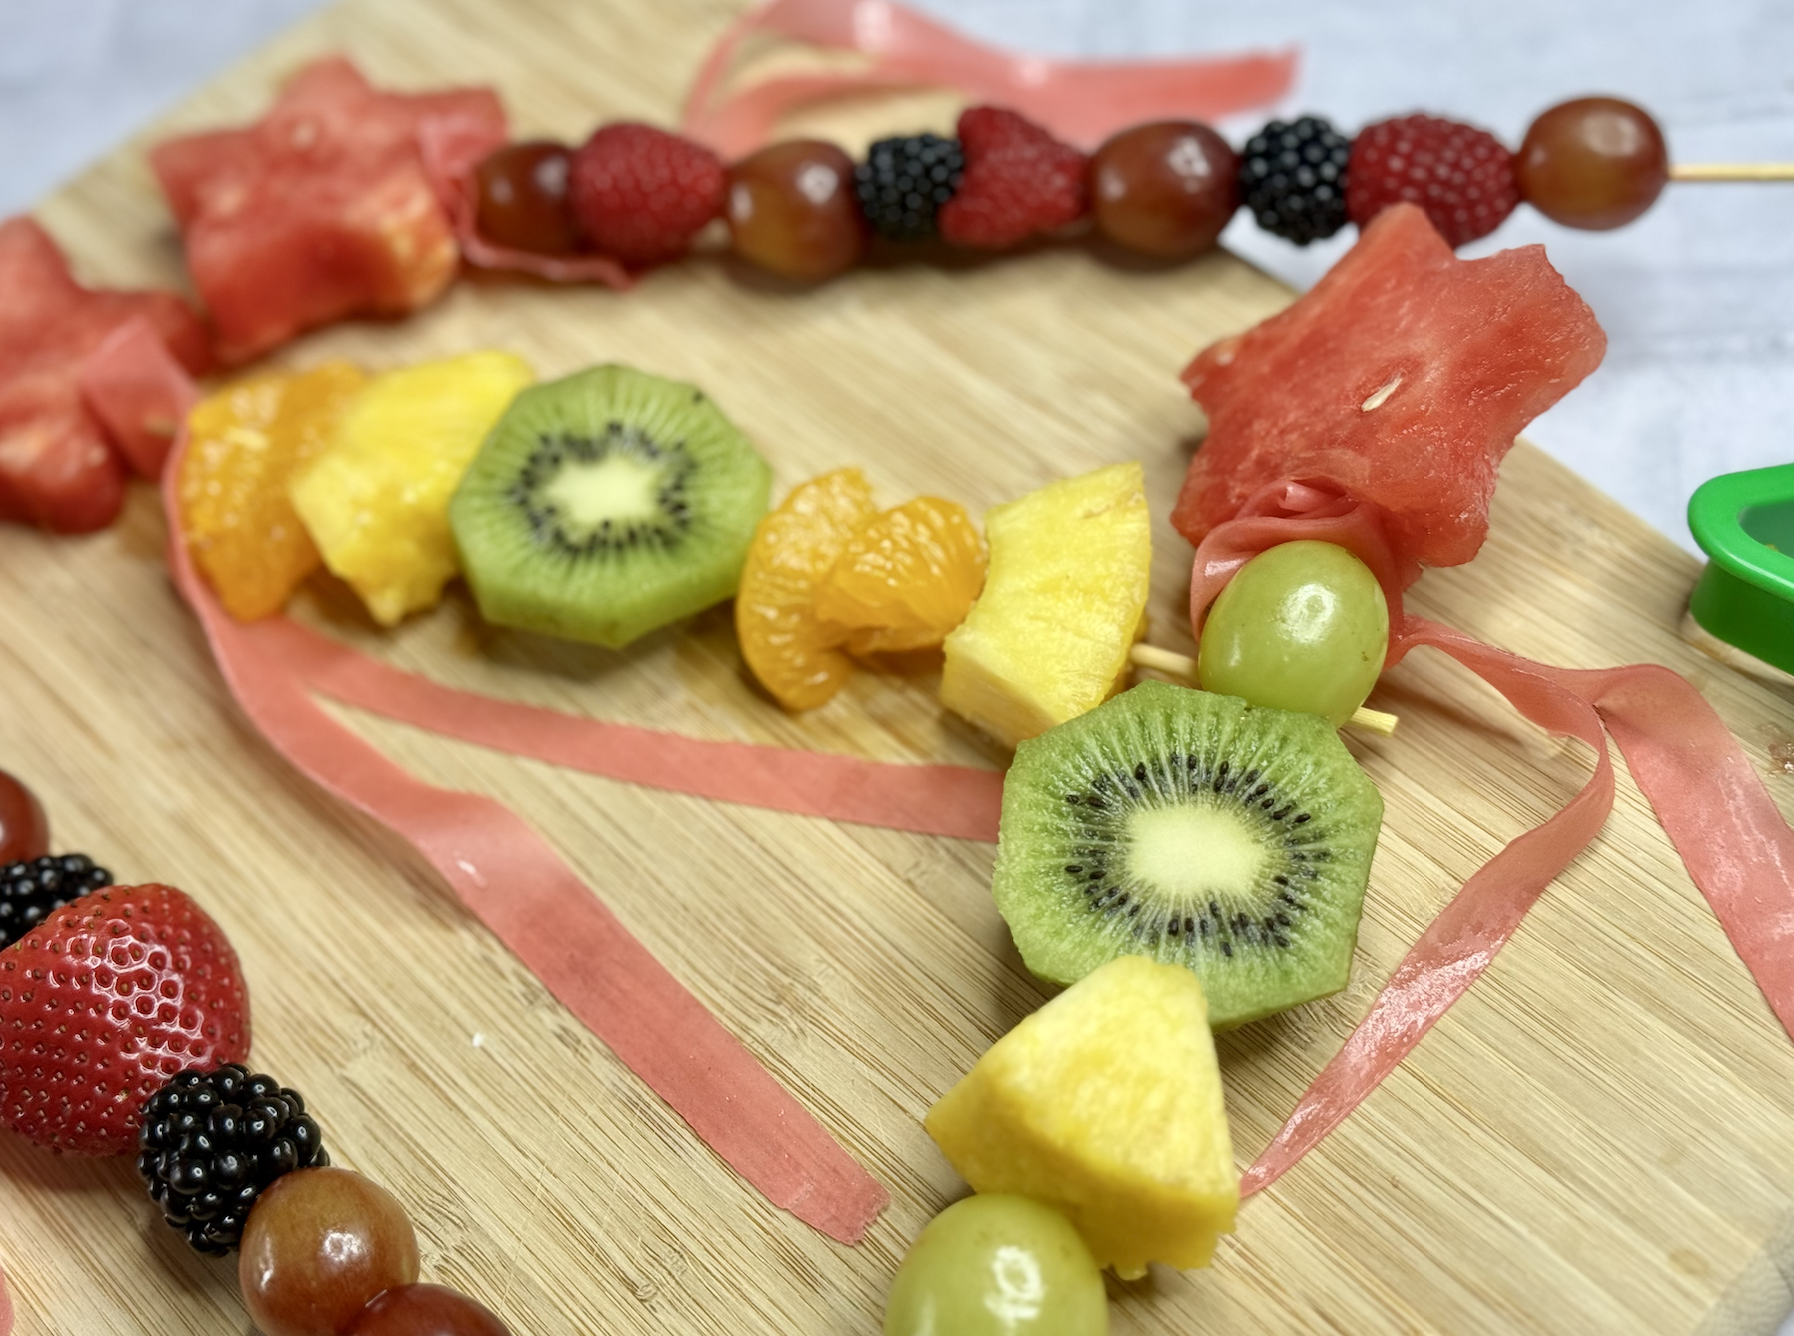
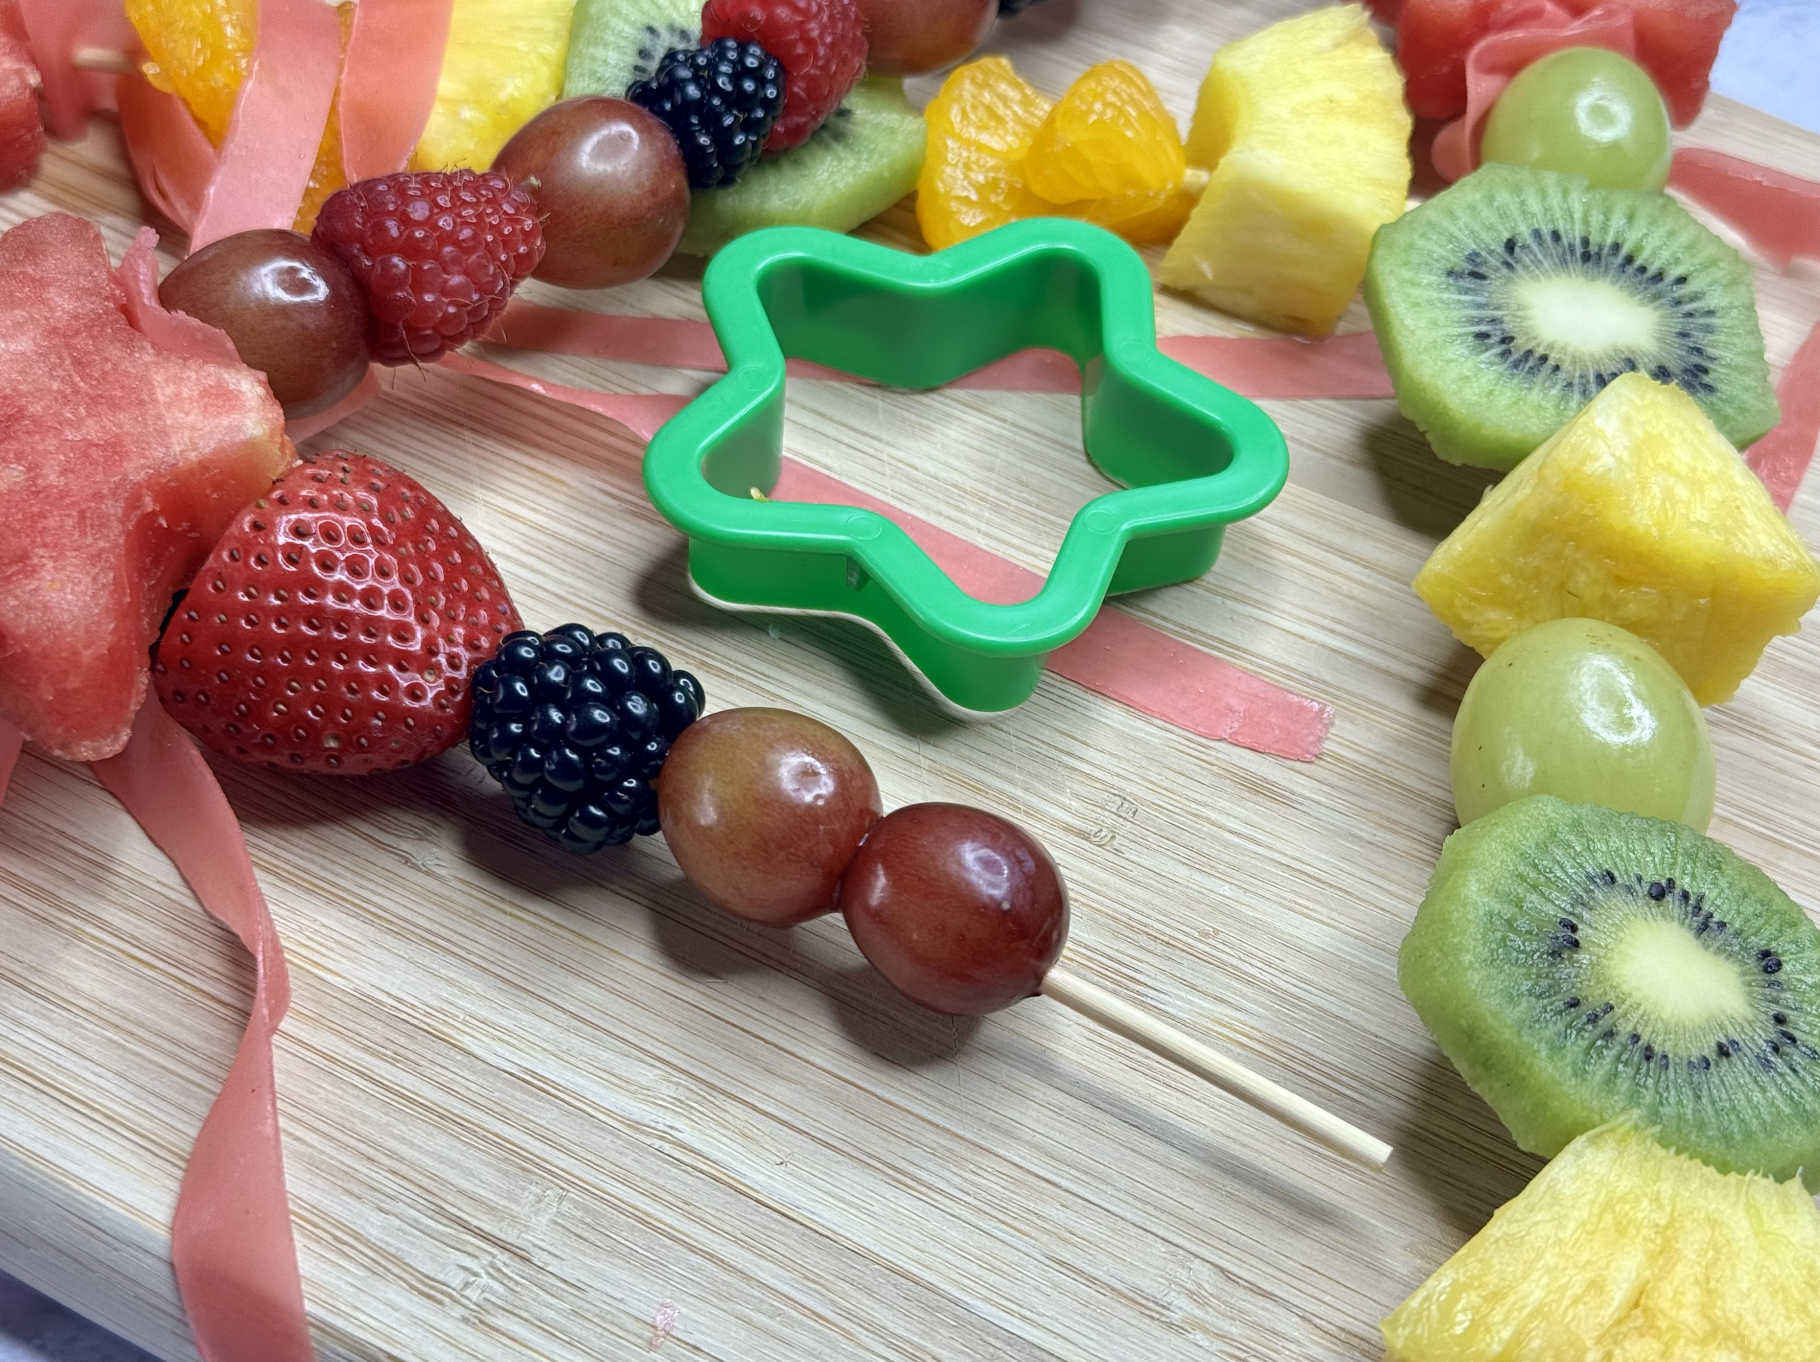
Rainbow Fruit Wands

WHAT GOES IN IT
Assorted fruits (strawberries, blueberries, pineapple chunks, mandarin oranges, kiwi slices, blueberries, grapes, etc.)
Wooden or metal skewers- whatever you have available. Just make sure your kids don’t use the metal ones as weapons because they can do some damage!
HOW TO MAKE IT
Prepare the Fruits:
Wash and dry all the fruits
Cut larger fruits like pineapple and melon into bite-sized pieces, big enough to slide on the skewer. Leave smaller fruits like berries and grapes whole.
Using cookie cutters or your artistic skills, cut the watermelon into a start shape to place at the top of the wand
Assemble the Wand:
Take a wooden skewer and start sliding the fruits onto it, alternating colors to create a rainbow effect. For example, start with a strawberry, followed by a piece of pineapple, a mandarin orange segment, a slice of kiwi, a blueberry, and a grape…you get the idea
Continue threading the fruits onto the skewers until they are filled, leaving space for your star on top.
Optional- Cut a piece of fruit leather (Fruit by the Foot works best) the same length as the wand then slide cut it lengthwise into two piece leaving it still attached at the top. Fold the top twice then slide on the wand just before add the star. The fruit by the foot will act as an edible ribbon. So cute!
Hot Tip- You can serve the fruit skewers with a side of yogurt or chocolate sauce for dipping to make them even more delicious
PRESS THE EASY BUTTON: Buy pre-cut fruit, especially larger ones like watermelon and cut way down on your prep time!
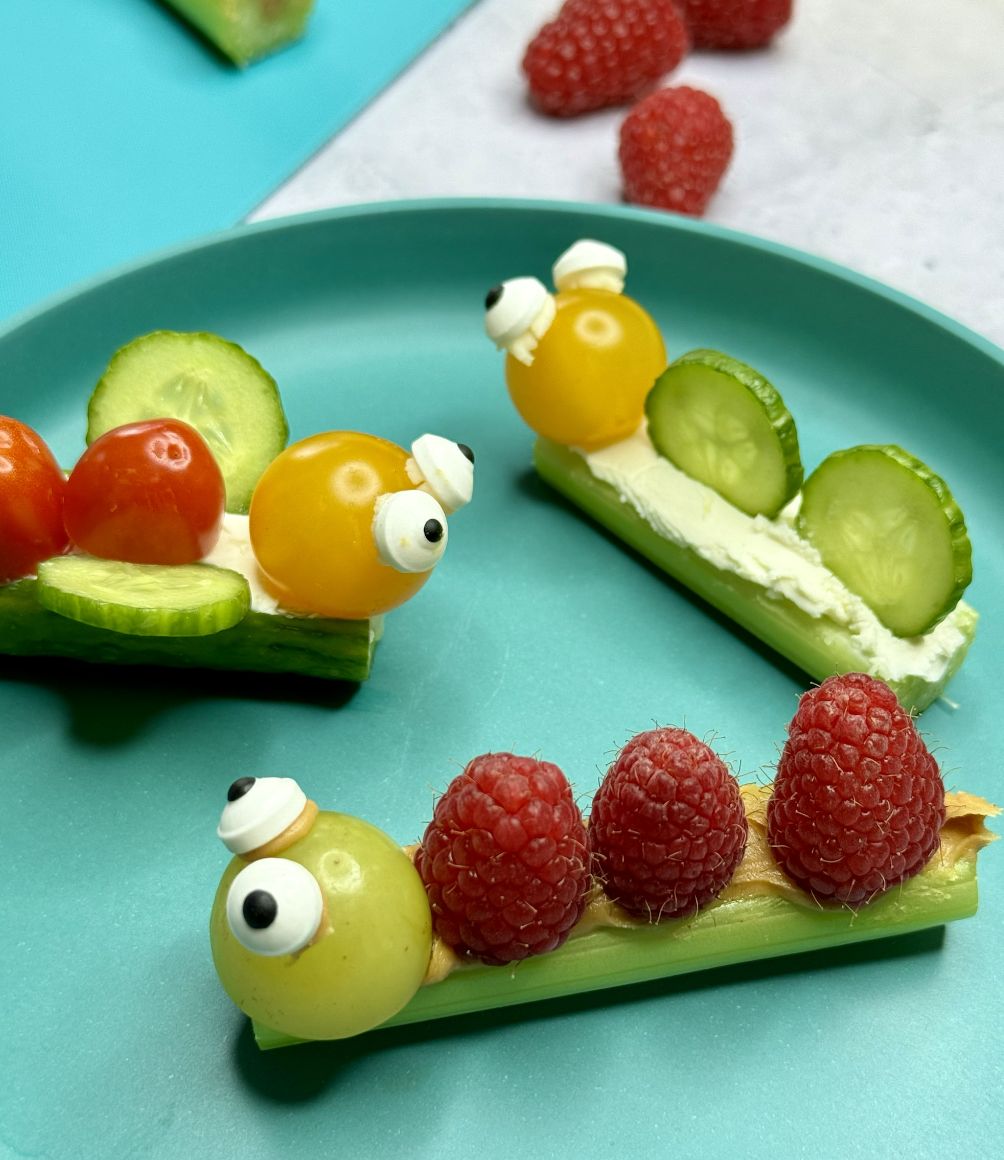
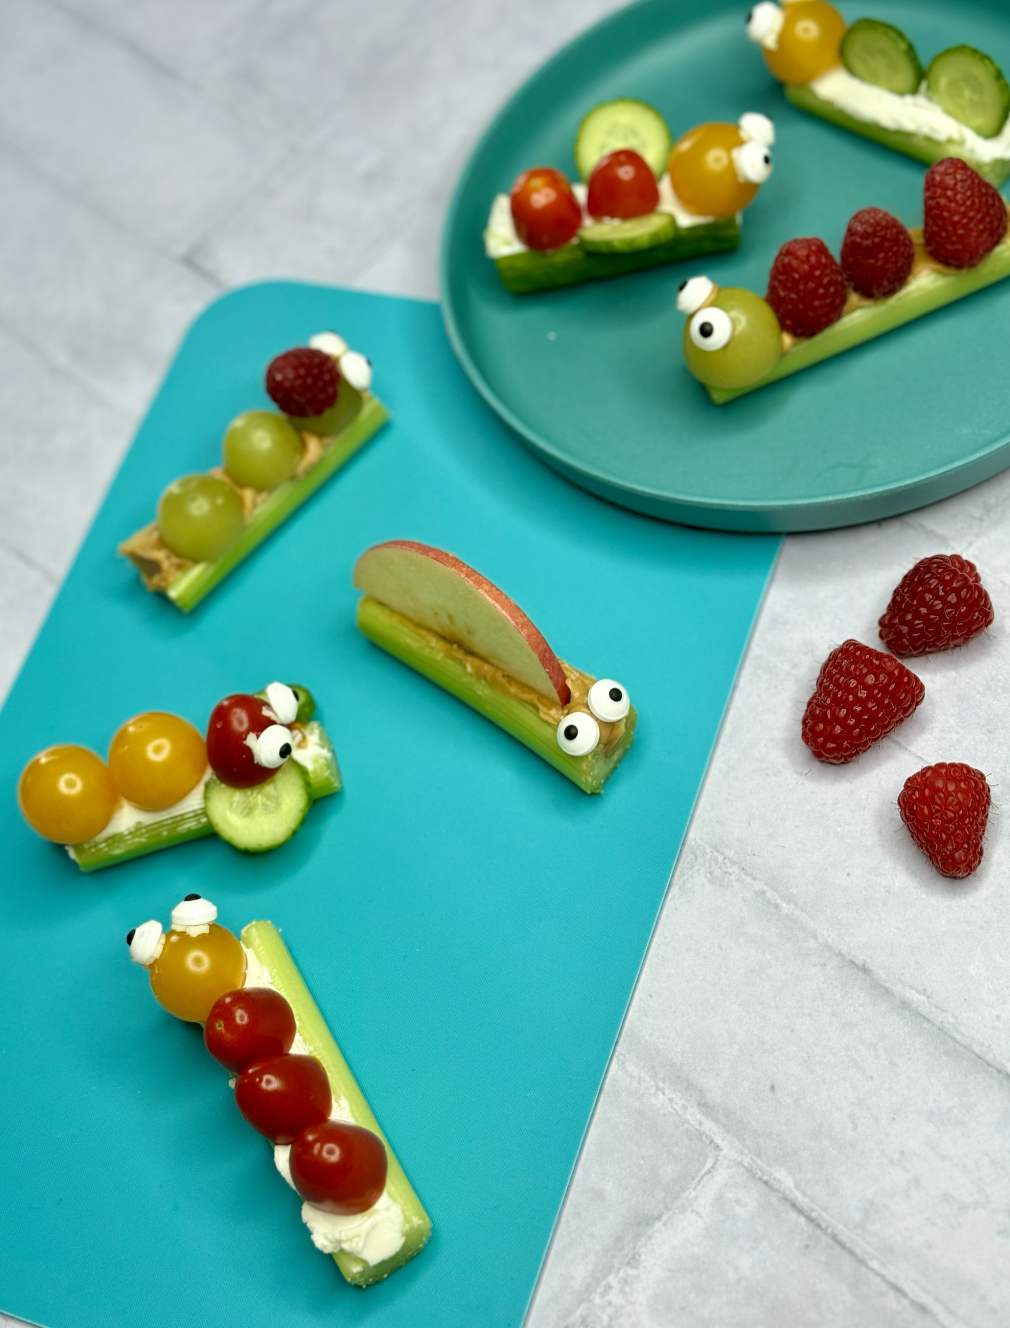
Veggie & Fruit Bugs

WHAT GOES IN IT
Assorted vegetables (cucumber, bell peppers, cherry tomatoes, carrots, celery, etc.)
Assorted fruits (grapes, strawberries, blueberries, kiwi, pineapple, etc.)
Cream cheese or hummus
Pretzel sticks or toothpicks
Edible googly eyes (optional but oh so cute)
HOW TO MAKE IT
Prepare the Veggies and Fruits:
Wash and dry all the vegetables and fruits thoroughly.
Slice the vegetables into thin rounds or sticks. Cut the fruits into small pieces or slices.
Assemble the Bug Bodies:
Choose a vegetable base for each bug. I like a small hollowed out cucumber or a piece of celery
Spread a small amount of cream cheese, hummus or nut butter on top of the vegetable base to act as "glue" for attaching the fruit and vegetable decorations.
Add the Bug Features:
Use slices of fruits like grapes, strawberries, or kiwi to create colorful wings, antennae, or legs for the bugs. Secure them in place with cream cheese or hummus.
For eyes, you can use raisins or currants placed on top of the bug bodies. If you have edible googly eyes, use them because they make them so much cuter!
PRESS THE EASY BUTTON: Use cucumber instead of celery. Trust me here, they’re way easier to balance and easier to eat. You can also serve the veggie and fruit bugs with a side of dip, such as ranch dressing. Tell them the bugs need to go for a swim before you eat them!
Don’t worry if your bugs come out a little lopsided or one of your rice cake bears is missing an eye. You’re having fun with your kids and that’s what counts. At the very least, you can feel good about the array of fruits and veggies your kids will be snacking on while making their masterpieces. And if some of the creations look a little more like a Picasso than a Michelangelo, that’s all good too.